StormForge + Kubecost: Better Together
Originally posted on the StormForge blog, 10/31/23.
Introduction
The challenge of cloud costs is one that every organization needs to grapple with. Whether its finance knocking on the door to reduce costs or rapid growth requiring efficient usage of resources, teams are tasked with optimizing their environments. The reality though is that most Kubernetes deployments are complex and users are left guessing at what is impacting their costs and how they can improve. Once an environment is scaled beyond a single application, it becomes challenging to really understand costs in a shared Kubernetes environment.
- Where do you start?
- How can you make changes without impacting reliability?
- Is all the work you are doing even making a dent?
- Are there even enough savings to be worth the effort?
All reasonable questions that go through an engineer’s mind as they are faced with the cost optimization challenge. Thankfully you are not alone. As we mentioned before, this is a challenge most, if not all, organizations go through. In this blog, we will outline a solution to this that gives you full cost monitoring plus automated optimization actions using Kubecost and StormForge that anyone can get started with for free today.
In order to get a full picture of your Kubernetes costs, you need a tool like Kubecost. Easy to spin up and start collecting data on where all your costs are coming from and giving you accurate cost values across your entire estate. However, being informed of your costs is only part of the equation. Now you have to actually address the inefficiencies shown in Kubecost. This means going through all your workloads and making sure requests are being set properly. That’s where Optimize Live comes in. Using machine learning, Optimize Live will find the optimal configuration for your CPU and memory requests and limits, along with the HPA target utilization for your HPA backed workloads, so that your Kubernetes environment is properly rightsized, and limited in waste. Optimize Live can automatically apply these recommendations across your entire estate so that you can put rightsizing on autopilot. In no time, you can see your cost numbers going down in Kubecost leading to an efficient, cost effective, Kubernetes environment.
Here at StormForge, we run Kubernetes, and as you can imagine, we also need to manage our cloud costs. In order to do this, we use both Kubecost and Optimize Live internally to continuously rightsize our resources and report our results to internal stakeholders.
The guide below will show you how to install both tools, get a snapshot of savings before optimization in Kubecost, optimize a workload with Optimize Live, and see those costs go down in Kubecost.
Step 1. Install Kubecost (2 mins)
Once you have a Kubernetes cluster and helm install, you can install the Kubecost Helm chart, with the following command:
helm upgrade --install kubecost \
  --repo https://kubecost.github.io/cost-analyzer/ cost-analyzer \
  --namespace kubecost --create-namespace
You should expect to see a message similar to the following upon completion:
Release "kubecost" does not exist. Installing it now.
NAME: kubecost
LAST DEPLOYED: Wed Oct 11 14:17:25 2023
NAMESPACE: kubecost
STATUS: deployed
REVISION: 1
TEST SUITE: None
NOTES:
--------------------------------------------------
Kubecost has been successfully installed.

Please allow 5-10 minutes for Kubecost to gather metrics.

If you have configured cloud-integrations, it can take up to 48 hours for cost reconciliation to occur.

When using Durable storage (Enterprise Edition), please allow up to 4 hours for data to be collected and the UI to be healthy.

When pods are Ready, you can enable port-forwarding with the following command:

    kubectl port-forward --namespace kubecost deployment/kubecost-cost-analyzer 9090

Next, navigate to http://localhost:9090 in a web browser.

Having installation issues? View our Troubleshooting Guide at http://docs.kubecost.com/troubleshoot-install
Kubecost will gather metrics over the next few days so we can see a trend before we start making changes with StormForge Optimize Live. During this time, Optimize Live will improve its recommendations as it collects performance metrics before allowing them to be applied.
In the meantime, we can configure Kubecost by connecting it to your cloud provider so you get the most accurate and up-to-date billing information.
Step 2. Install StormForge Optimize Live (2 mins)
Now we can move on to install StormForge Optimize Live.
Proceed to app.stormforge.io/signup/ and get yourself an account. Immediately upon logging in you will be presented with a wizard to produce a helm install command for the Optimize Live agent.
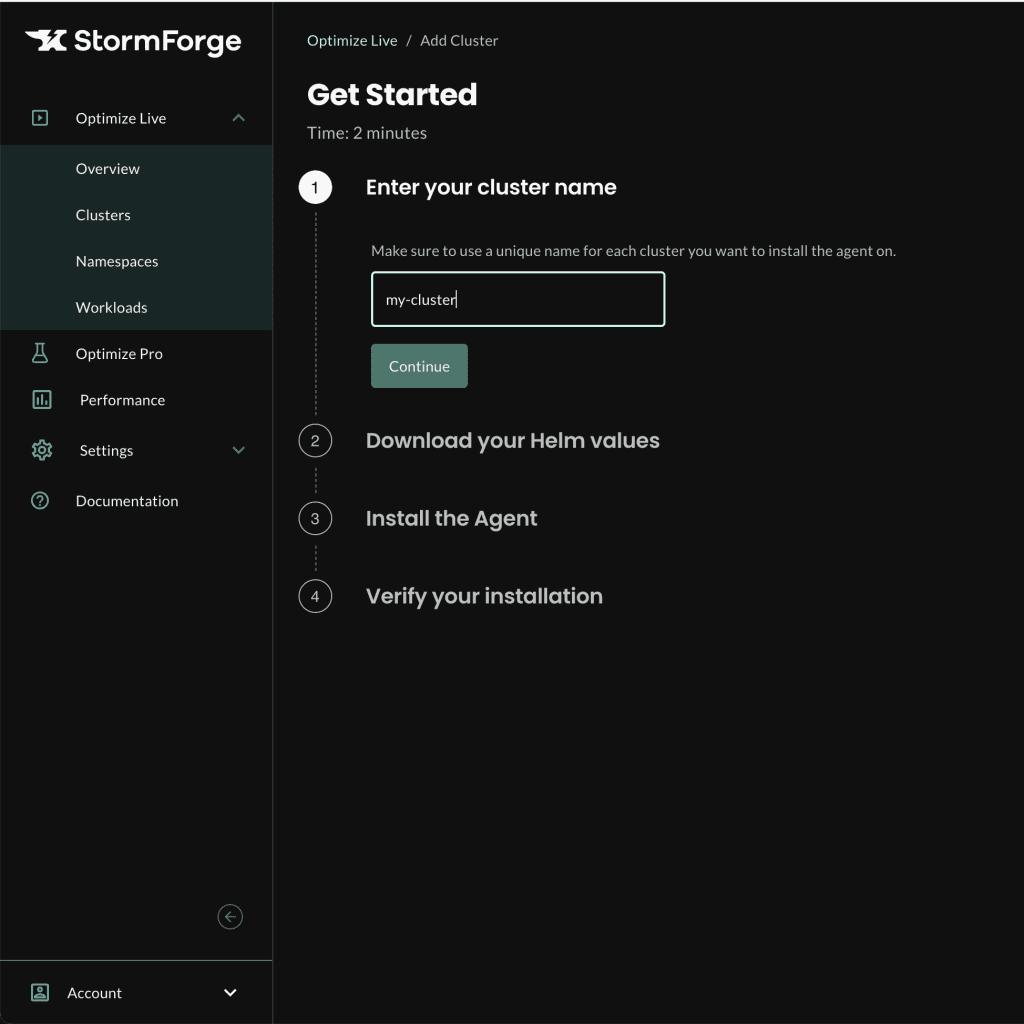
In the first step, we’ll use the cluster name my-cluster.
In the second step, we download the helm values file to my ~/Downloads directory.
In the third step, we cd ~/Downloads and then run the command provided from the UI.
helm install stormforge-agent oci://registry.stormforge.io/library/stormforge-agent \
  --namespace stormforge-system \
  --create-namespace \
  --values my-cluster-01.yaml
Pulled: registry.stormforge.io/library/stormforge-agent:2.8.0
Digest: sha256:d1b73a7e71d718778bdf2188aacb7b01f9fc61f882634ab4c5d3338520776c23
NAME: stormforge-agent
LAST DEPLOYED: Mon Oct 23 11:00:13 2023
NAMESPACE: stormforge-system
STATUS: deployed
REVISION: 1
NOTES:
---
                         █████████████████████████        ████████████████████
█████████████████████████████████████████████████       ██████████████████████
 ██████████████████████████████████████████████       ████████████████████████
   ██████████████████████████████████████████        ████████████████████
      ██████████████████████████████████████             █████████████
          █████████████████████████████████████████    █████████████
                █████████████████████████████████    █████████████
                             ██████████████████   ████████████████
                               ███████████████ ███████████████████
                                ██████████████████████████████████
                                 ███████████████████████████████████
                                ██████████████████████████████████████
                             █████████████████████████████████████████████
                         █████████████████████████████████████████████████████
                         ███████████████████████        ██████████████████████
                         █████████████████████           █████████████████████

StormForge Optimize Live has been installed!

If you are installing Optimize Live for the first time, it will take us about
1 hour to collect enough data to generate your initial recommendations. When
they're ready, you'll be able to see them at:

  https://app.stormforge.io/

Having installation issues? To perform a quick health check, try running:

  $ helm test stormforge-agent -n stormforge-system --logs

Or view our Troubleshooting Guide at:

  https://docs.stormforge.io/optimize-live/guides/troubleshooting/

---
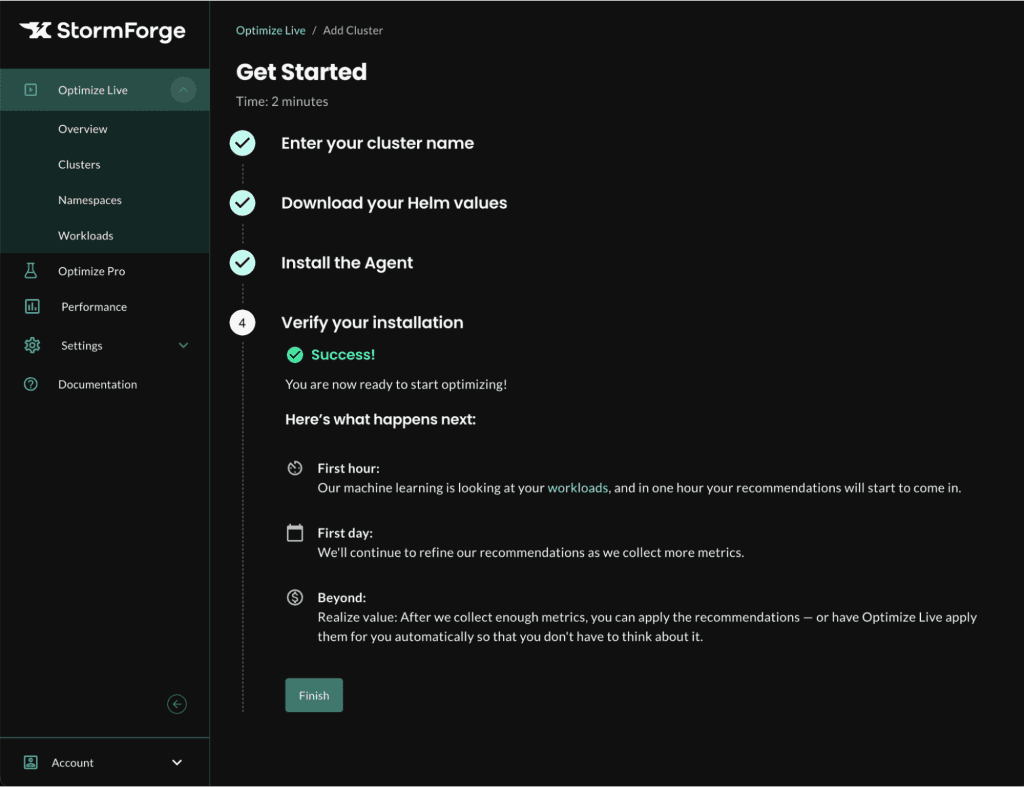
Lastly, hit the “verify install” button in the UI to confirm the agent is connected to the StormForge platform.
Step 3. View preliminary recommendations / cost data
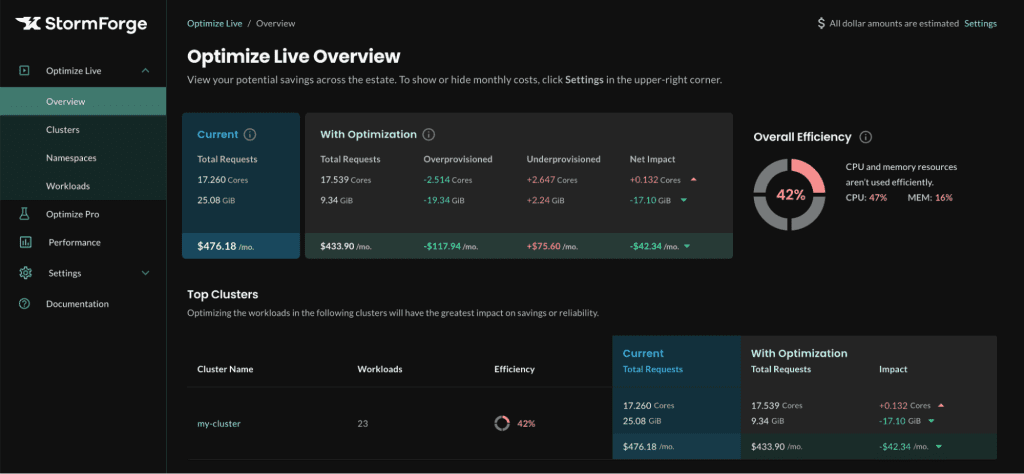
After an hour, you will have preliminary recommendations so you can view the projected impact of using Optimize Live in your cluster. This gives you a quick indication of the savings available to you.
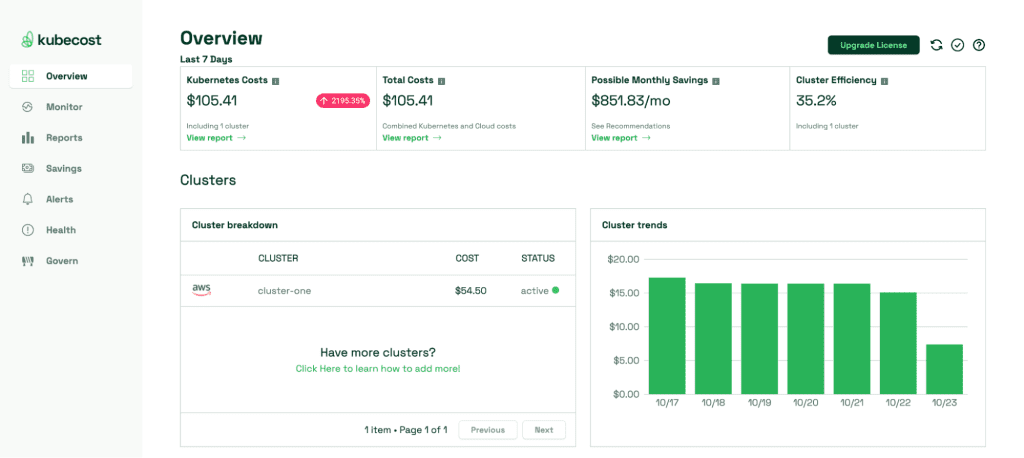
You can also review the savings page in Kubecost to see possible cost saving measures available for your cluster. The following steps will walk through how to achieve savings using Optimize Live’s machine learning based rightsizing recommendations for workloads.
kubectl port-forward --namespace kubecost deployment/kubecost-cost-analyzer 9090
Navigate to localhost:9090/savings in your browser to review.
Step 4. The learning period: Wait 1 week for metrics to gather and produce optimal recommendations
It takes a week to have full data in Kubecost and Optimize Live recommendations that are ready to apply. At any point during the learning period you are welcome to export a patch and apply it directly, especially for workloads that are the most under or overprovisioned.
We already have an environment running, so we’ll give you a preview.
Step 5. View cost data in Kubecost
kubectl port-forward --namespace kubecost deployment/kubecost-cost-analyzer 9090
Navigate to localhost:9090 in your web browser.
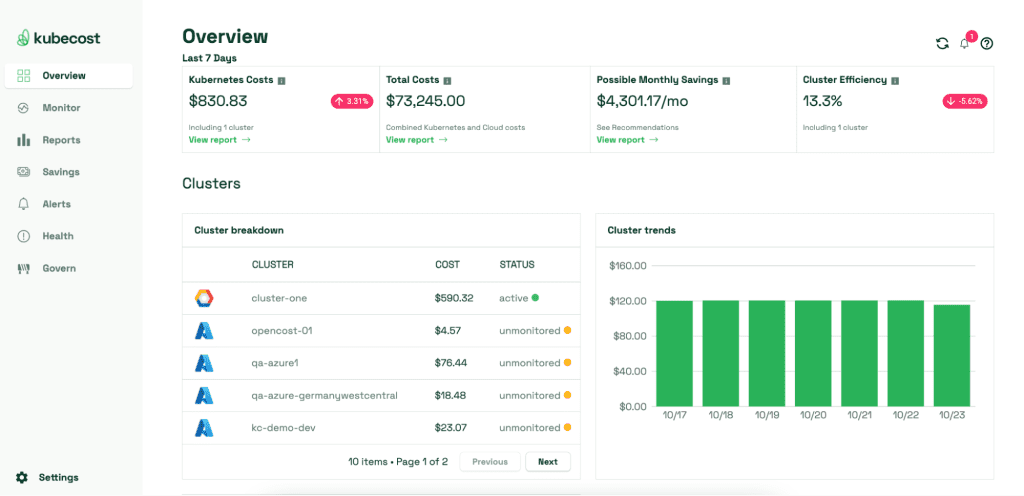
Now that you have 7 days of data, Kubecost’s default dashboard will be complete and you’ll be able to see any differences between days of the week.
Step 6. Apply a recommendation for a workload in Optimize Live
Choose a workload you are interested in to try out a recommendation on, we can click the export patch button which allows us to get a patch we can apply directly with kubectl.
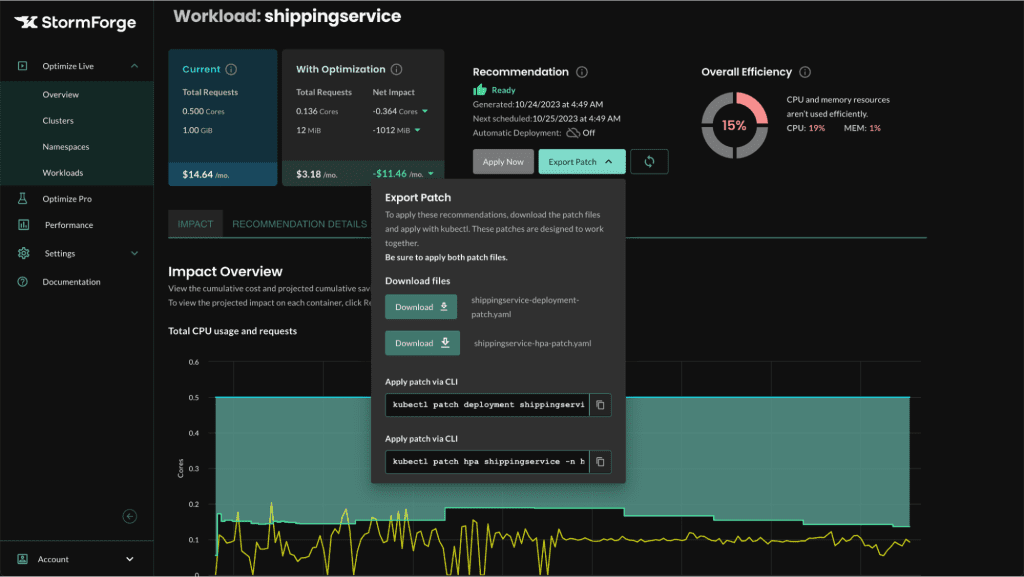
Save the file to ~/Downloads and then you can copy the kubectl patch command to run from the UI.
To make this easier, you can install the Optimize Live Applier which allows you to use the “Apply Now” button in the UI and also automatically schedule applications. Alternatively, you can utilize a GitOps workflow to automate recommendation applications.
NOTE: Optimize Live takes a few minutes to display the change to current requests in the UI. The Optimize Live agent needs to send the updated requests from your cluster to the StormForge platform. At that point, hitting the refresh button next to the export patch button will update the current requests in the UI. In the meantime, you can look at Kubecost to view the impacts of the change in the next step.
Step 7. See the resulting cost data for that workload change in Kubecost
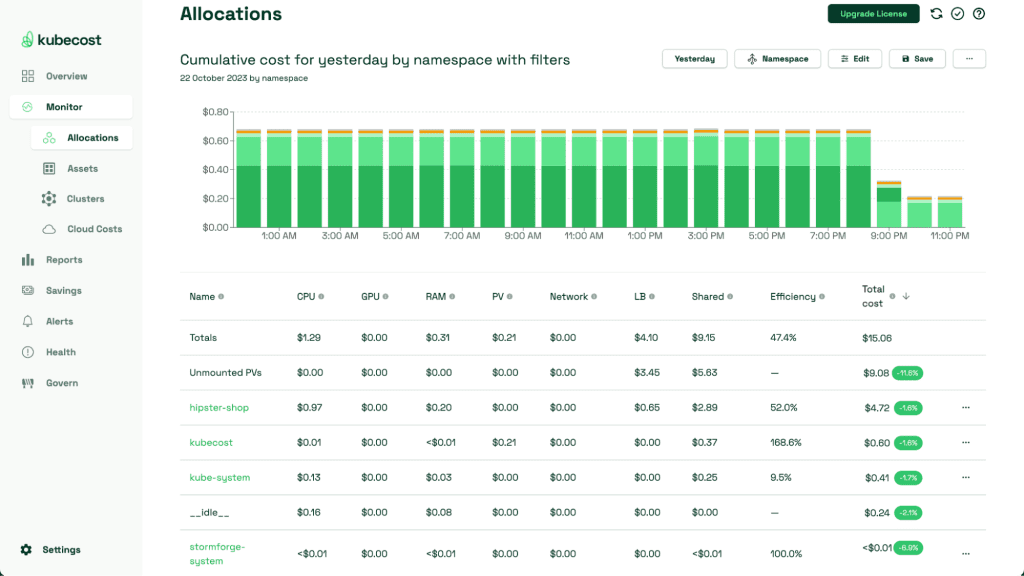
Choose the monitor section in the left hand nav.
- This will bring you to the allocations page.
Select the namespace of the workload you applied the recommendation to.
- In the top bar, choose “last 24” hours instead of “last 7 days”.
Now you can watch the cost for this workload change as the next hours of metric data rolls in.
Step 8. What should you do next?
You can keep applying recommendations, and as you do so, you will be able to see those cost changes in Kubecost for each workload. You will also be able to see a difference at the namespace and cluster level as well.
Conclusion
As you can see, installing Kubecost and Optimize Live only takes a matter of minutes. After a few days of collecting metrics, you can see exactly where your Kubernetes costs are coming from with an easy way to reduce your costs while improving your reliability by rightsizing your container requests with Optimize Live.
Figuring out where all your Kubernetes costs are coming from and how to reduce them can be daunting, but with Kubecost + Optimize Live you are equipped with the tools to inform you of your costs and take action to reduce them.
Ready to learn more about using Kubecost and StormForge? Come talk to Kubecost at booth #M10 and StormForge at booth #A18 at KubeCon + CloudNativeCon North America 2023 in Chicago Nov 6-9, 2023.
Stay tuned for our next update in this blog series that combines Kubecost, StormForge, and Karpenter to achieve even further savings.
Reach out to us at product@stormforge.io if you’re interested in learning more or being a part of our beta testers.