Core Kubernetes components - Learn through hands-on examples
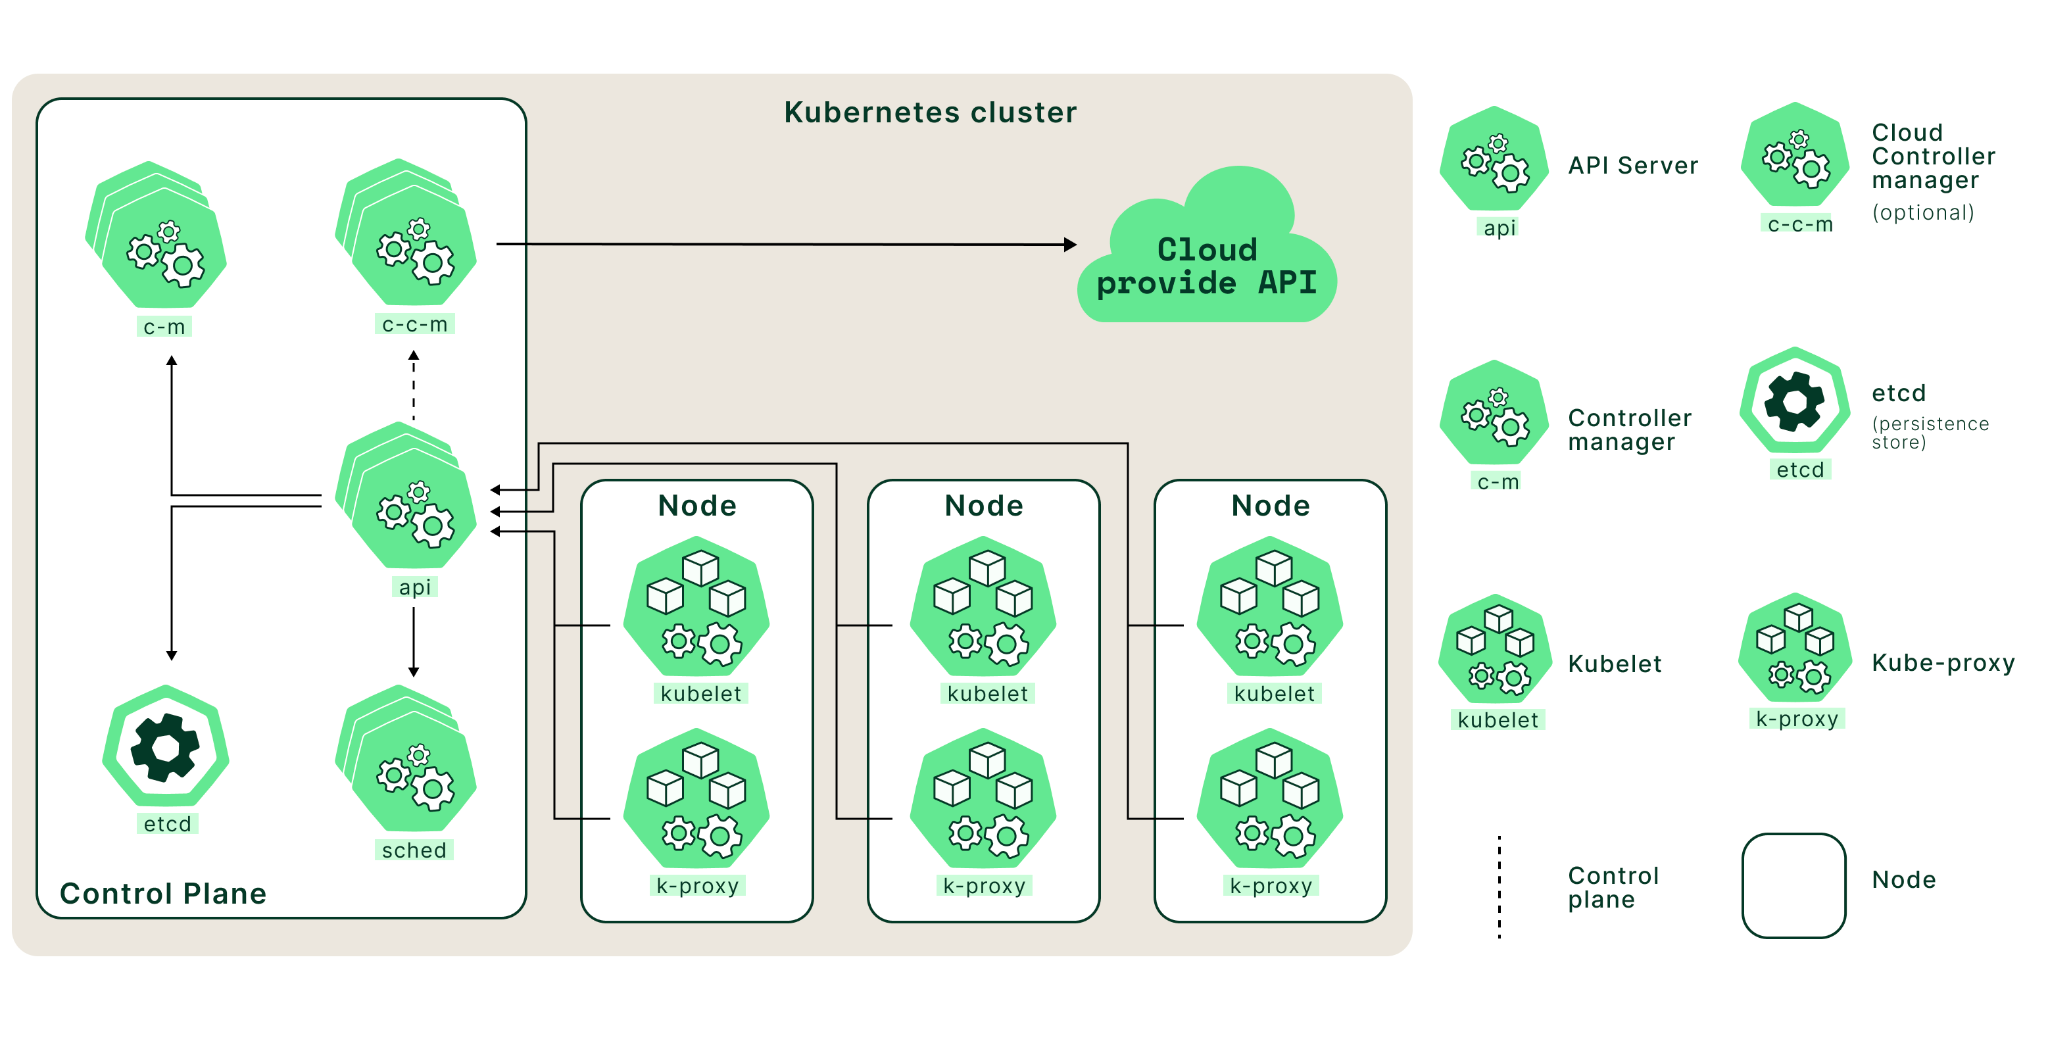
Kubernetes is a powerful open-source platform for managing and automating containerized application deployment, scaling, and management. Kubernetes is composed of several components that work together to form its architecture. These components are primarily divided into control plane components and worker node components.
The control plane components are responsible for managing the entire Kubernetes cluster. These include an API server, scheduler, controller manager, and etcd (a distributed key-value store), which all work in sync to maintain cluster integrity and facilitate node communication.
The node component consists of virtual or physical computers running on-premises or in the cloud. These components run container applications and manage their lifecycle via container runtimes such as Docker, containerd, or CRI-O.
In this article, we’ll take a closer look at Kubernetes components, including both the control plane and worker node components. We’ll start by deploying a local Kubernetes cluster and use it to provide a grounding for practical understanding of the components that goes beyond just words and diagrams. By the end of this post, you should have a good understanding of each component and its purpose. Let’s get started!
Summary of key concepts related to Kubernetes components
Kubernetes Components
| Concept | Summary |
|---|---|
| Kubernetes architecture |
|
| Control plane components |
|
| Worker node components |
|
| Kubernetes addons |
|
Prerequisites
- Docker (download and install steps)
- Kind (download and install steps)
- kubectl
Deploy a Kubernetes cluster locally using Kind
In this tutorial, we will be using Kind (Kubernetes IN Docker) to install a Kubernetes cluster locally. There are other alternatives to Kind, such as minikube, and K3s; if you are familiar with these options, you can use these tools as well.
To deploy a local Kubernetes cluster using Kind, you will need to install and start Docker on your machine. Once you have docker running, you can create a cluster as follows:
❯ kind create cluster
You will see output similar to that shown below:
Creating cluster "kind" ...
 ✓ Ensuring node image (kindest/node:v1.25.3) 🖼
 ✓ Preparing nodes 📦
 ✓ Writing configuration 📜
 ✓ Starting control-plane 🕹️
 ✓ Installing CNI 🔌
 ✓ Installing StorageClass 💾
Set kubectl context to "kind-kind"
You can now use your cluster with:

kubectl cluster-info --context kind-kind
To verify cluster status, execute the command below:
❯ docker ps

CONTAINER ID   IMAGE                  COMMAND                  CREATED          STATUS          PORTS                       NAMES
1efbe5bcff5c   kindest/node:v1.25.3   "/usr/local/bin/entr..."   22 minutes ago   Up 22 minutes   127.0.0.1:60067->6443/tcp   kind-control-plane
You now have a locally running Kubernetes cluster. We will interact with this cluster to help explain various Kubernetes components as we proceed.
Comprehensive Kubernetes cost monitoring & optimization
Kubernetes architecture
To view these components in action, let’s get the running processes from the cluster we created in the section above.
To open an interactive shell inside the docker container running as a Kubernetes cluster, execute this command:
❯ docker exec -it kind-control-plane bash

root@kind-control-plane:/#
To get the running processes from the cluster, execute the following:
root@kind-control-plane:/# ps aux | grep -v pause | awk '{print $11}'

COMMAND
/sbin/init
/lib/systemd/systemd-journald
/usr/local/bin/containerd
/usr/local/bin/containerd-shim-runc-v2
/usr/local/bin/containerd-shim-runc-v2
/usr/local/bin/containerd-shim-runc-v2
/usr/local/bin/containerd-shim-runc-v2
kube-scheduler
kube-apiserver
kube-controller-manager
etcd
/usr/local/bin/containerd-shim-runc-v2
/usr/local/bin/containerd-shim-runc-v2
/usr/local/bin/kube-proxy
/bin/kindnetd
/usr/local/bin/containerd-shim-runc-v2
/usr/local/bin/containerd-shim-runc-v2
/usr/local/bin/containerd-shim-runc-v2
/coredns
/coredns
local-path-provisioner
Now the output is easily readable. We can see various Kubernetes components running as processes, such as kube-scheduler, kube-apiserver, kube-controller-manager, etc.
We will learn about all these components in the sections that follow.
Control plane components
The control plane is a set of components that comprise the core of Kubernetes. These components are responsible for scheduling, creating, and managing containers across a cluster of nodes.
kube-apiserver
At its core, the Kubernetes API server acts as an intermediary between user requests and the underlying components of a given cluster. It works by receiving requests from users via an HTTP or HTTPS request, validating those requests using predefined rules, and then forwarding them to other components (such as nodes) to perform an action such as deploying or scaling an application.
The API server also interfaces with other components in the control plane. For example, it can receive requests from the scheduler to create new pods in a cluster or talk to the controller manager to adjust an application’s resource utilization.
Consult the documentation to learn more about the kube-apiserver
K8s clusters handling 10B daily API calls use Kubecost
Learn Moreetcd
etcd is an open-source storage system that stores data as key/value pairs across multiple servers in a cluster. CoreOS developed it as part of its distributed systems platform.
Kubernetes uses etcd as its primary storage mechanism for storing all its cluster state information, such as configurations, endpoint information, service definitions, secrets, etc.
etcd can be set up in a highly distributed manner across multiple nodes so that no single node can become a point of failure. If one node fails or becomes unavailable, other nodes still have access to the same consistent set of data, making it possible to maintain availability and high performance even under extreme load conditions or during unexpected outages.
etcd is an indispensable component of any Kubernetes deployment because it provides reliable storage for vital application data while enabling reliable communication among components within and between clusters.
Consult the documentation to learn more about the etcd component.
kube-scheduler
Kubernetes has a built-in cluster scheduler that is responsible for assigning workloads to available nodes in the cluster. The kube-scheduler determines which node should run each application within the cluster. The node selection process includes deciding which nodes have enough resources to meet an application’s requirements and which are most appropriate based on user preferences.
The kube-scheduler uses an algorithm known as bin packing to determine where to place containers in the cluster. This algorithm considers all available resources (CPU, memory, etc.) and maximizes utilization while ensuring that no single node is overloaded.
In addition, the scheduler will consider other factors, such as node labels (for example, if certain nodes need to be used only for specific purposes) or affinity rules (which allow you to specify which nodes a particular container should run on). The scheduler also keeps track of any changes in resource usage over time, so it can scale the pods in or out (if pod scaling is configured using solutions such as Horizontal Pod Autoscaler).
If any changes occur in terms of resource availability or user preferences, the scheduler will react by changing existing workload assignments or creating new assignments as needed.
Consult the documentation to learn more about the kube-scheduler.
kube-controller-manager
Kubernetes uses a built-in controller framework that ensures that all the nodes in your cluster are running as expected. It includes several controllers, each of which is responsible for a specific aspect of the cluster’s behavior:
- Node controller: The node controller is responsible for ensuring that all nodes in the cluster are healthy and ready to accept workloads. It monitors the status of nodes on an ongoing basis and takes corrective action if any node fails or becomes unresponsive. For example, it can remove the unresponsive node from the cluster if necessary.
- Replication controller: The replication controller runs continuously in the background to ensure that all pods (containers) are running as expected. It can detect when new pods have been added or removed from the cluster and adjust accordingly by starting or stopping additional pods to maintain desired pod count levels.
- Service account and token controllers: These two controllers work together to manage authentication within a Kubernetes cluster by creating and managing service accounts and tokens for users to securely access resources within their environments.
- Endpoints controller: This controller manages communication among services on different cluster nodes. It creates endpoints on those services to allow other services to communicate with them directly without going through an external load balancer. This helps improve application performance by reducing latency across services in a distributed system like Kubernetes clusters.
The kube-controller-manager also provides other essential functions, such as managing the namespace lifecycle, handling service accounts, and managing configuration changes. Overall, the kube-controller-manager plays a critical role in ensuring the desired state of the Kubernetes cluster.
Consult the documentation to learn more about the kube-controller-manager component.
cloud-controller-manager
The cloud-controller-manager is an essential component of Kubernetes that manages communication between the application and infrastructure layers. It provides a way for applications running on Kubernetes to interact with cloud services such as Amazon Web Services (AWS) or Google Compute Engine (GCE). Specifically, it enables you to provision resources from your preferred cloud provider and configure them within the Kubernetes cluster. Additionally, it allows you to access features such as load balancers or other networking capabilities offered by cloud providers.
The cloud-controller-manager runs as part of the control plane in Kubernetes, translating user requests into API calls that the underlying cloud provider can understand. For example, when an administrator wants to create a new load balancer in Amazon Elastic Kubernetes Service (EKS) or Google Kubernetes Engine (GKE), the admin will define the configuration in the Kubernetes cluster, which gets relayed to the appropriate API call via the cloud controller manager. The cloud controller manager also handles tasks such as scaling resources in or out based on user demand and ensuring that all resources are configured correctly before allowing applications to use them.
The cloud controller manager is a crucial component of Kubernetes because it enables you to harness the powerful features of cloud providers while managing cluster resources. This makes deploying complex applications much more straightforward than if Kubernetes administrators had to manage each resource manually. In addition, because the cloud controller manager operates as part of the control plane in Kubernetes, it ensures that all cluster nodes manage resources reliably. This makes it considerably simpler for administrators to ensure that clusters constantly operate at peak performance.
Consult the documentation to learn more about the cloud-controller-manager component.
Learn how to manage K8s costs via the Kubecost APIs
Watch WebinarWorker node components
A worker node is a physical or virtual machine in Kubernetes responsible for running containerized apps, represented as pods and managed by the control plane. Each worker node has a kubelet that connects with the control plane to retrieve the necessary state for the pods operating on that node and a container runtime responsible for running the containers within the pods.
The worker node also runs additional system components, such as the kube-proxy, which aid in managing networking in the cluster. In a Kubernetes cluster, the worker nodes provide the computing power required to run containerized applications.
kubelet
The kubelet is essential to any Kubernetes worker node, acting as a bridge between the master and worker nodes. It runs on each node in the Kubernetes cluster to manage containers, monitoring their health and ensuring that they have access to enough resources for optimal performance.
The kubelet connects with other cluster components, such as the API server, scheduler, and replication controller, to coordinate tasks. Periodically, the kubelet interacts with the API server to retrieve the desired state of the containers and pods running on its node.
The desired state includes information such as which containers and pods must be running on the node, which images must be deployed, and how they must be configured. After retrieving the intended state, the kubelet compares it to the present state of containers and pods on the node. If the current state does not match the desired state, the kubelet takes action to reconcile the two, such as starting or stopping containers or creating or deleting pods.
Kubelet also monitors container health by checking CPU/memory use and notifying the API server of any anomalies related to a specific container’s performance or health status.
Consult the documentation to learn more about the kubelet component.
kube-proxy
The worker nodes of Kubernetes are responsible for operating the cluster’s applications. The kube-proxy component is essential to these nodes since it functions as a proxy between cluster services and external clients. It controls which services can access each other and ensures that requests from external clients reach the correct service to manage network traffic.
Kube-proxy offers load-balancing features by dispersing incoming requests over different service endpoints. This ensures that all requests are efficiently handled and prevents any single endpoint from overloading.
Kubernetes kube-proxy also manages networking across pods, ensuring communication among containers within and between pods. This enables containers running in different pods to connect without using public IP addresses or directly exposing themselves to the Internet.
Consult the documentation to learn more about the kube-proxy component.
Kubernetes addons
Kubernetes addons are software packages that extend the core capabilities of Kubernetes. They enable Kubernetes administrators to gain visibility into the applications’ performance, availability, and scalability on Kubernetes clusters. This includes real-time metrics for DNS management, CPU utilization, memory usage, network traffic, disk I/O operations, etc., all of which can identify potential bottlenecks or other issues when running applications on a cluster.
The primary purpose of these addons is to provide an easy way for developers and administrators to monitor their applications’ performance in real-time. By knowing what resources are being used by an application at any given time, it is easier to make decisions about scaling up or down as necessary to meet demand or conserve resources. This helps to ensure that the applications run smoothly without downtime or other issues resulting from inefficient resource utilization.
DNS
Kubernetes utilizes CoreDNS, a software-defined networking (SDN) solution, to route traffic among nodes within its cluster network architecture. CoreDNS is an open-source, plugin-driven DNS server that runs as a pod within each node of the cluster network architecture and listens for requests from clients outside the cluster.
With CoreDNS installed on each node, communication among nodes within the cluster can be handled using standard DNS queries/responses rather than more complex protocols such as HTTP. This helps reduce communication latency among services running within the cluster network and external users.
In addition, CoreDNS enables Kubernetes administrators to set unique rules based on their requirements, allowing them to govern traffic across their clusters more efficiently.
Kubernetes Dashboard
Kubernetes Dashboard is a web-based UI for managing applications running in a Kubernetes cluster. It provides an intuitive, user-friendly way of interacting with a cluster.

The dashboard includes features such as deployment management, scaling applications in or out, and debugging services. Additionally, users can monitor pod health and resource utilization across nodes in the cluster and perform troubleshooting tasks such as creating logs or rolling back deployments if necessary.
Resource monitoring
Resource monitoring involves collecting data from cluster components, such as nodes, pods, services (endpoints that host exposed APIs), and deployments. All this data is aggregated in real-time to be analyzed for anomalies or potential issues with resource utilization. This data can then be used to determine which components need more resources or are not being utilized efficiently. It also provides insights into how different components interact, so administrators can adjust configurations to improve overall performance.
Some monitoring solutions (such as Prometheus) also include features such as alerting and notifications, so users can stay informed about changes or potential problems before they become major issues.
Logging
Logging refers to the process of tracking events that occur within an application or system. This data can then be used to analyze trends, diagnose problems, and identify areas for improvement. The events logged can range from user actions and system errors to performance metrics and security alerts.
Logging is essential to running applications on Kubernetes; without it, you won’t have visibility into how your applications perform or know if any potential problems are brewing beneath the surface.
Kubernetes makes it easy to deploy applications with logging enabled. Several popular addons available for Kubernetes provide out-of-the-box support for logging. These include Fluentd (an open-source log collector), Elasticsearch (a distributed search engine), and Grafana (a platform for creating visualizations). Each addon offers different features and capabilities.
These solutions provide features beyond Kubernetes native logging, such as custom alerting rules, anomaly detection capabilities, and proactive security measures.
Comprehensive Kubernetes cost monitoring & optimization
Conclusion
This article reviewed the core Kubernetes components, focusing on their functionality and roles within the Kubernetes architecture. The control plane components, including kube-apiserver, etcd, kube-scheduler, kube-controller-manager, and cloud-controller-manager, work together to maintain the cluster’s desired state. Similarly, the worker node components, such as kubelet and kube-proxy, facilitate the deployment and management of containerized applications across the infrastructure. Supporting these core components are Kubernetes addons that allow for the efficient monitoring and logging of processes within the cluster environment.
Understanding how to use Kubernetes involves a steep learning curve. However, this comprehension can be invaluable in creating an infrastructure that can handle growth while promoting flexibility and agility through cloud computing resources. There are a lot of resources available such as the links provided in this article. Use these resources to further and deepen your knowledge of Kubernetes. Happy learning.