Kubernetes Taints & Tolerations: Tutorial With Examples
Pod scheduling is one of the most important aspects of Kubernetes administration. Effective scheduling can improve performance, reduce costs, and make clusters easier to manage at scale. Kubernetes taints and tolerations enable administrators to address several advanced scheduling use cases.
In this article, we’ll take a closer look at what taints and tolerations are, compare them to other advanced scheduling techniques, and walk through a hands-on tutorial.
What are taints and tolerations?
Taints are a Kubernetes node property that enable nodes to repel certain pods. Tolerations are a Kubernetes pod property that allow a pod to be scheduled on a node with a matching taint.
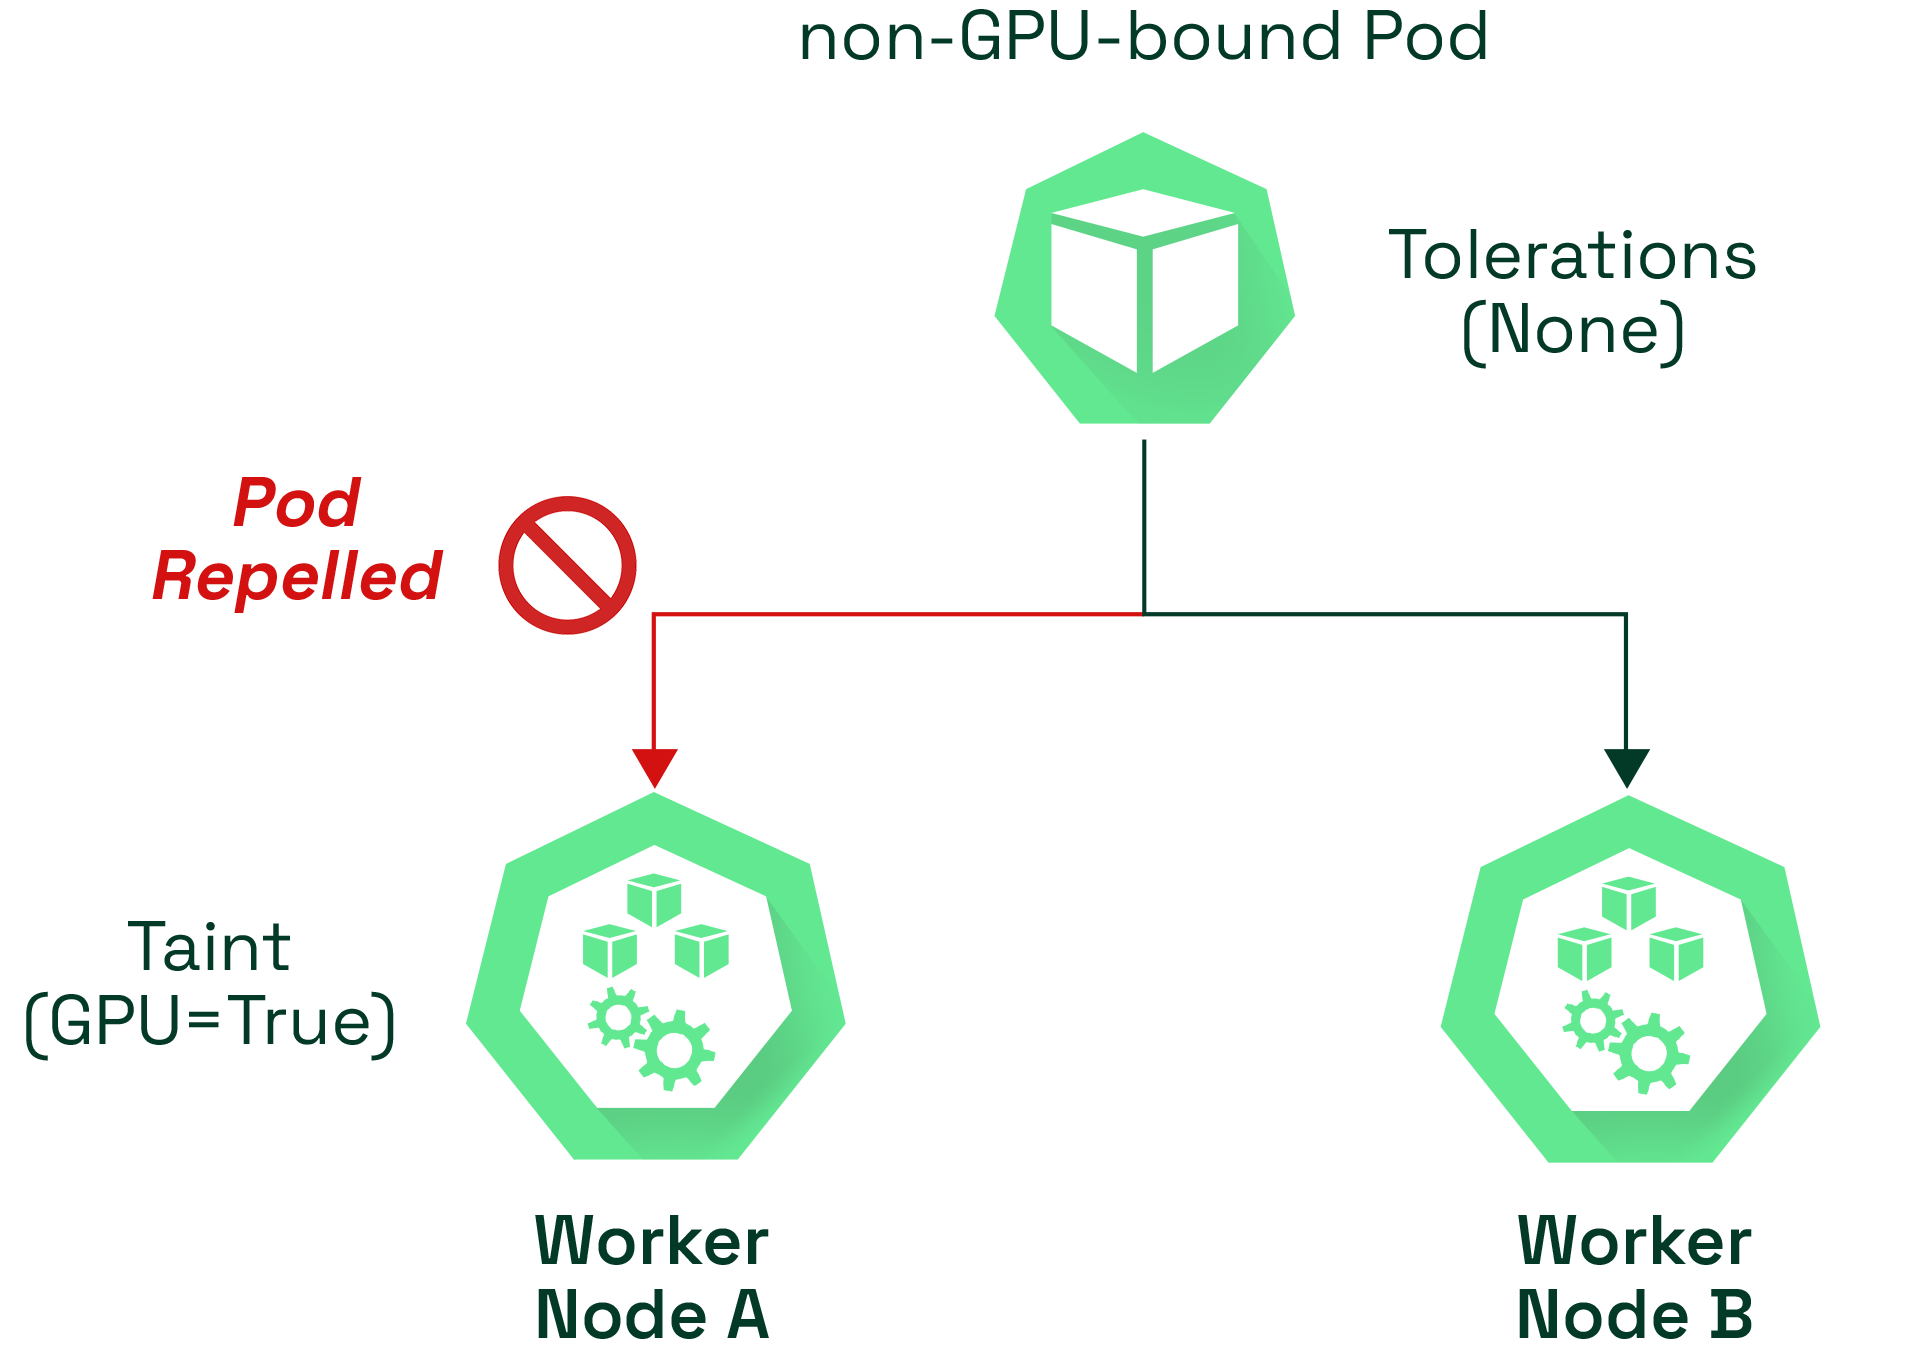
Let’s use an example to demonstrate the benefits of taints and tolerations. Consider a three-node cluster that consists of a master node and two worker nodes (node A and node B). Worker node A has an attached GPU, making it expensive but well suited for GPU-accelerated workloads while the worker node B is general purpose node without an attached GPU.
By adding a taint to the worker node A and only giving the necessary toleration to the GPU specific workloads, administrators can ensure that Kubernetes will only schedule workloads that can be accelerated with a GPU in the worker node A. All other pods will be scheduled on our general purpose worker node B. This technique ensures that valuable GPU capacity isn’t wasted in the underlying hardware by the wrong types of workloads.
Another example would be to use taints and tolerations to utilize spot nodes. As spot nodes use excess capacity of the service provider, they can lead to massive saving but with the caveat that these instances can be taken away at any moment. If a workload is qualified to run on a spot node, the ideal way to configure Kubernetes to utilize these spot nodes is to add taints and tolerations so these workloads will tolerate the tainted spot instances.
Kubernetes taints and tolerations vs. pod anti-affinity
Kubernetes taints and tolerations aren’t the only method for advanced Kubernetes scheduling. Pod anti-affinity can prevent schedulers from locating new pods on nodes where the label selector on the new pod matches the label on an existing pod. Anti-affinity relies on label key-value pairs on other pods to determine its scheduling behavior.
Taints and tolerations may seem similar in functionality to anti-affinity with logical controllers such as NotIn or DoesNotExist. However, they provide more fine-grained control over pod scheduling than anti-affinity. For example, automated tainting can be used with node conditions and tolerations to control pod behavior if there is an issue on an underlying node.
Kubernetes taints and tolerations vs. node affinity
Node affinity is another advanced scheduling technique. With node affinity, users can control where pods are scheduled. It also relies on labels that are applied to the nodes and schedules pods on matching nodes.
While taints and tolerations can repel pods from a node, they cannot ensure that a pod gets scheduled on a specific node. A pod can end up on any node without a taint repelling it.
Administrators can combine node affinity with taints and tolerations to create dedicated nodes that only allow specific pods to run on them. For example, worker node A could be given a GPU taint and a GPU label, and GPU-accelerated workloads could be given a GPU toleration and a GPU label affinity. This ensures that non-GPU-accelerated workloads won’t be scheduled on GPU nodes (taint/toleration) and that GPU-accelerated workloads will only get scheduled on nodes with GPUs (affinity).
Kubernetes taints and tolerations use cases
At a high level, the three most common use cases for Kubernetes taints and tolerations are:
-
Specifying nodes with special hardware—Often, pod workloads must run on nodes with specialized hardware such as non-x86 processors, optimized memory/storage, or resources like GPUs. Administrators can ensure that only relevant pods will be scheduled on the node by tainting these nodes and adding the relevant tolerations to the required pods.
-
Creating dedicated nodes—As mentioned earlier, taints and tolerations can be combined with node affinity to create dedicated nodes. Node affinity sets the node to schedule pods using labels by specifying the nodeAffinity in PodSpec, while taints on the node ensure that all pods without a matching toleration get repelled.
-
Taint-based pod evictions based on node conditions—TaintBasedEvictions allows users to automatically add taints based on node conditions and set up custom eviction behavior for pods on a node.
How to use Kubernetes taints and tolerations
Now that you have an understanding of taints and tolerations, let’s move on to working with them.
In the examples below, we’ll walk through how to use taints and tolerations in a Kubernetes cluster. You can follow along using a basic Kubernetes cluster provisioned with minikube. All the following examples are carried out in a Windows 10 environment with minikube v 1.24.0 and Kuberenetes v1.22.3 on Docker 20.10.8
How to add Kubernetes taints
The kubectl taint command with the required taint allows us to add taints to nodes. The general syntax for the command is:
$ kubectl taint nodes <node name> <taint key>=<taint value>:<taint effect>
Users can specify any arbitrary string for the taint key and value. The taint effect defines how a tainted node reacts to a pod without appropriate toleration. It must be one of the following effects;
-
NoSchedule — The pod will not get scheduled to the node without a matching toleration.
-
NoExecute — This will immediately evict all the pods without the matching toleration from the node.
-
PerferNoSchedule — This is a softer version of NoSchedule where the controller will not try to schedule a pod with the tainted node. However, it is not a strict requirement.
For our example, let’s assume that there is a node with access to GPU resources and we only want to schedule pods that are capable of using GPU resources on it. To achieve this, we can taint the node as shown below.
kubectl taint nodes minikube-m02 gpu=true:NoSchedule
The expect result of this command is:
node/minikube-m02 tainted
Next, let’s use the describe node command with the tainted node to verify the taint.
$ kubectl describe nodes minikube-m02
Name:               minikube-m02
Roles:              <none>
Labels:             beta.kubernetes.io/arch=amd64
                    beta.kubernetes.io/os=linux
                    kubernetes.io/arch=amd64
                    kubernetes.io/hostname=minikube-m02
                    kubernetes.io/os=linux
Annotations:        kubeadm.alpha.kubernetes.io/cri-socket: /var/run/dockershim.sock
                    node.alpha.kubernetes.io/ttl: 0
                    volumes.kubernetes.io/controller-managed-attach-detach: true
We can remove the taint by specifying the taint key and the taint effect with a minus(-) to signify the removal. The basic syntax of the command is:
kubectl taint nodes <node name> <taint key>:<taint effect>-
Now, let’s remove the previously added taint to the minikube-m02 node.
kubectl taint nodes minikube-m02 gpu:NoSchedule-
The expected result from this command is:
node/minikube-m02 untainted
How to add tolerations
Next, we will add tolerations to the pods so that they will not get repelled from the tainted node. Tolerations are specified in PodSpec in the following formats depending on the operator.
Equal Operator
tolerations:
- key: "<taint key>"
  operator: "Equal"
  value: "<taint value>"
  effect: "<taint effect>"
Exists Operator
tolerations:
- key: "<taint key>"
  operator: "Exists"
  effect: "<taint effect>"
The Equal operator requires the taint value and will not match if the value is different. Yet, the Exists operator will match any value as it only considers if the taint is defined regardless of the value.
As shown below, we can use the equal operator for the gpu=true:NoSchedule taint defined earlier.
apiVersion: v1
kind: Pod
metadata:
  name: nginx-test
  labels:
    env: test-env
spec:
  containers:
  - name: nginx
    image: nginx:latest
    imagePullPolicy: IfNotPresent
    resources:
      requests:
        memory: "128Mi"
        cpu: "250m"
      limits:
        memory: "512Mi"
        cpu: "500m"
  tolerations:
  - key: "gpu"
    operator: "Equal"
    value: "true"
    effect: "NoSchedule"
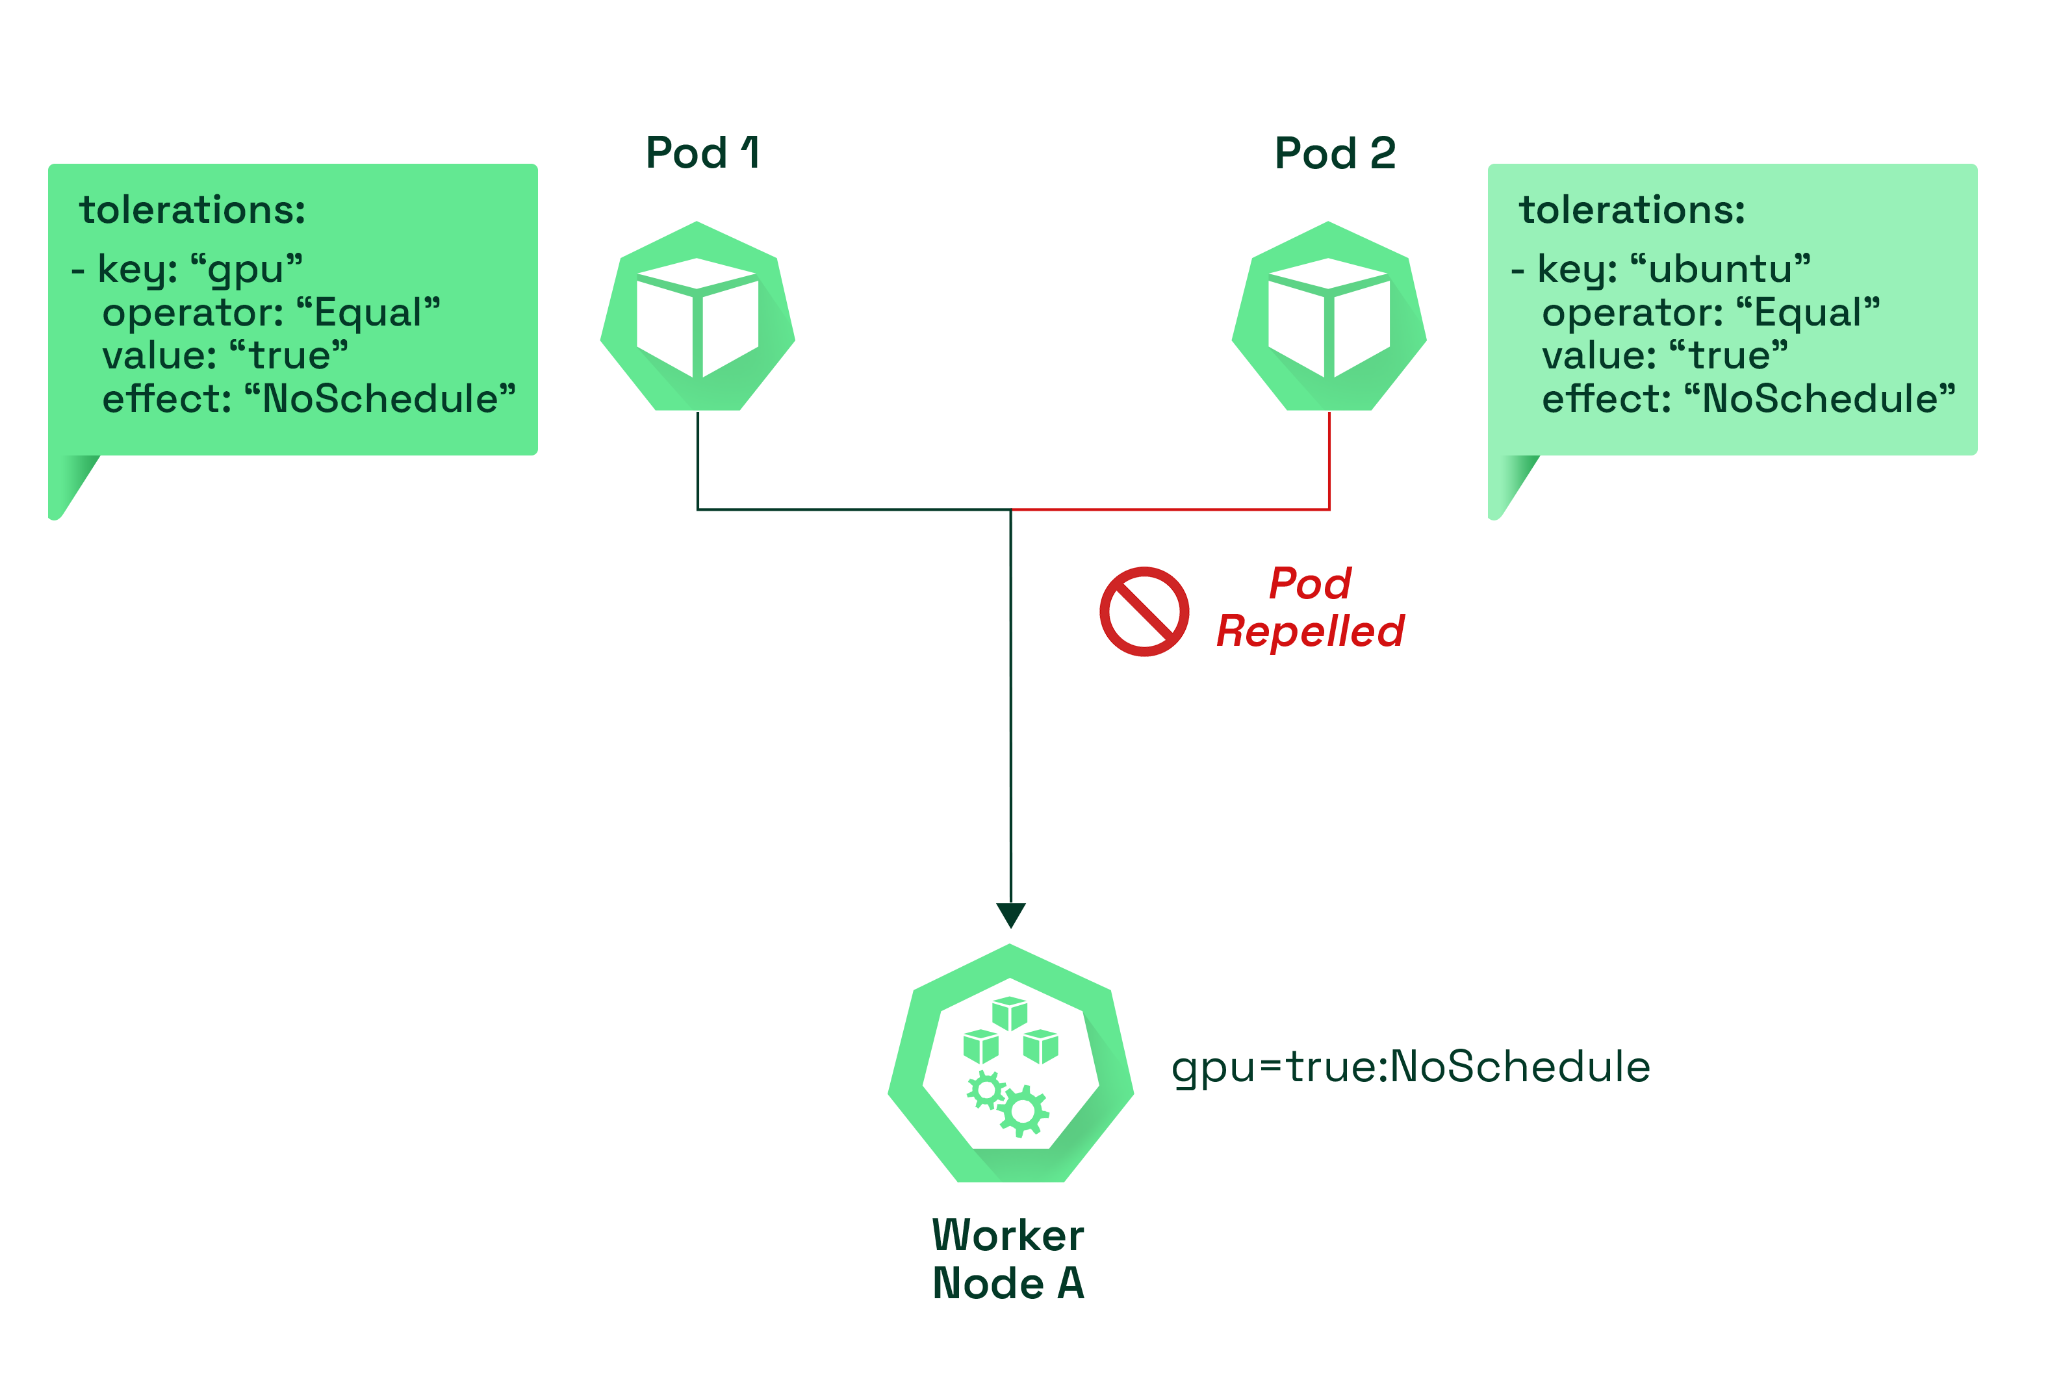
The diagram below details our configuration so far. We have two pods with different tolerations and different taint keys. Only the pod with the matching toleration, which is the gpu (taint key), will be allowed on the node.
Additional toleration formats
In some cases, you may need to match any taint or any value of a taint key. You can meet this requirement using the exists operator.
Match any Taint
As shown below, we can match any taint in a node by simply defining the Exists operator without a key, value, or effect.
tolerations:
  operator: "Exists"
Match any value of a Taint Key
We can match any value and effect in any node with the specified taint key by defining the operator and the key, as shown below.
tolerations:
  operator: "Exists"
  key: "<taint key>"
Using multiple taints and tolerations
Kubernetes supports multiple taints and tolerations on nodes and pods. This feature allows Kubernetes to process these taints and tolerations as a filter. It will look at all the available taints, ignore the ones that have a matching toleration, and apply the effect of the non-matching taint.
To further explain how this process takes effect, assume we have the following three taints on one of our nodes.
kubectl taint nodes minikube-m02 gpu=true:NoSchedule
kubectl taint nodes minikube-m02 project=system:NoExecute
kubectl taint nodes minikube-m02 type=process:NoSchedule
Then, we create a pod but put only two taints to match.
apiVersion: v1
kind: Pod
metadata:
  name: nginx-test
  labels:
    env: test-env
spec:
  containers:
  - name: nginx
    image: nginx:latest
    imagePullPolicy: IfNotPresent
    resources:
      requests:
        memory: "128Mi"
        cpu: "250m"
      limits:
        memory: "512Mi"
        cpu: "500m"
  tolerations:
  - key: "gpu"
    operator: "Equal"
    value: "true"
    effect: "NoSchedule"
  - key: "project"
    operator: "Equal"
    value: "system"
    effect: "NoSchedule"
In this situation, there’s no matching taint for the third taint, while the first two taints have matching tolerations. Therefore, the pod will get repelled from this node, and the pods within the node will continue to run without interruption as the third taint effect is NoSchedule. However, all pods that do not tolerate taint will get evicted immediately if the unmatched taint has the NoExecute effect.
What is the NoExecute effect?
The NoExecute effect evicts pods from a node if they do not tolerate a specific taint. Users can define how long a pod stays within a node when there is a matching taint by using the optional tolerationSeconds field in the tolerations section for NoExecute. It ensures that the pod remains within the node for the specified period before being evicted. The NoExecute get applied according to the following rules:
-
Pods without the matching tolerations get evicted immediately.
-
Pods that have matching toleration and have specified tolerationSeconds field will remain within the node for the specified time before getting evicted. The pod will not get removed if the taint is removed before the time expires.
-
Pods that have matching tolerations and without the tolerationSeconds field will continue to live within the node unless manually removed.
Take a look at the following pod configuration with the effect NoExecute and tolerationSeconds set to 3600 seconds. When a matching taint is added to the node the Pod will only stay within the node for 3600 seconds before getting evicted. If the taint is removed before the time specified in tolerationSeconds the Pod will not get evicted from the node.
apiVersion: v1
kind: Pod
metadata:
  name: nginx-test
  labels:
    env: test-env
spec:
  containers:
  - name: nginx
    image: nginx:latest
    imagePullPolicy: IfNotPresent
    resources:
      requests:
        memory: "128Mi"
        cpu: "250m"
      limits:
        memory: "512Mi"
        cpu: "500m"
  tolerations:
  - key: "cpu"
    operator: "Equal"
    value: "true"
    effect: "NoExecute"
    tolerationSeconds: 3600
Understanding taint based evictions
As mentioned previously, the NoExecute effect can be used to evict pods within a node. The node controller will automatically taint nodes if certain conditions are true, such as node being unreachable, network unavailability, and memory or disk pressure. You can find the full list of default conditions in the Kubernetes documentation. When a default condition occurs, the node controller or kubelet will add the relevant taints to the nodes with the NoExecute effect.
Administrators can modify the default behavior by creating custom tolerations. For example, Kubernetes automatically adds tolerations for node.kubernetes.io/not-ready and node.kubernetes.io/unreachable with tolerationSeconds set for 300 (5 minutes) by default. However, administrators can change this behavior by explicitly specifying toleration for these node conditions within the pod.
For example, the configuration below will override the default eviction behavior and allow the pod to remain within the node for an hour before eviction.
tolerations:
- key: "node.kubernetes.io/unreachable"
  operator: "Exists"
  value: "NoExecute"
  tolerationSeconds: 3600
Best practices for using taints and tolerations
-
Keep it simple—Do not overcomplicate taint keys and values. Always try to keep them short and simple, which will help maintain them in the long term.
-
Check for matching taints and tolerations before using NoExecute—Ensure the required pods within the specified node have matching taints and tolerations before implementing the NoExecute effect.
-
Monitor cluster costs—Overuse of taints and tolerations can interfere with the scheduler, impacting the efficiency of the cluster and resulting in higher costs. Kubecost allows administrators to monitor and manage costs within the cluster and optimize the scheduling properly.
-
Use node affinity to schedule pods on specific nodes—Taints and tolerations should not be used as a mechanism to schedule pods in specific nodes. This application may be viable in smaller clusters where repelled pods will get scheduled in any other available node. Yet, it should be implemented using node affinity combined with taints and tolerations.
Conclusion
Taints and tolerations are a key aspect of Kubernetes scheduling. They allow Kubernetes administrators to repel specific pods from tainted nodes and can act as filters in multi-taint implementations. Additionally, they can modify the pod eviction behavior based on node conditions. Kubernetes taints and tolerations can also be combined with other scheduling features such as node affinity to create dedicated nodes and fine-tune pod scheduling.