The Guide to Kubernetes Labels
Using metadata tags attached to different resources and objects is a must-have requirement for any Kubernetes (K8s) environment. Kubernetes labels allow DevOps teams to perform in-cluster object searches, apply bulk configuration changes, and more. Labels can help simplify and solve many day-to-day challenges encountered in Kubernetes environments:
| Challenge | Description |
|---|---|
| Troubleshooting | A pod’s CPU pegs at 100%. Its label helps you quickly determine if it supports a test or a production environment. |
| Configuration | You want to apply a patch but only to a dozen containers supporting your application front-end. You use labels to isolate those containers. |
| Cost monitoring, allocation, and management | A handful of tenants share a cluster, and you want to generate a cost allocation report. You use Kubecost to generate the report and group the data by the relevant label. |
In this article, you will learn about:
- Tagging Methods
- Use Cases for Kubernetes Labels
- Labeling Best Practices
- What You Should NOT Do With Kubernetes Labels
Tagging Methods
To help organize cluster resources, Kubernetes provides two ways to tag metadata to objects:
1. Via Labels
Labels are key-value pairs used to attach identifying metadata to Kubernetes objects. Kubernetes provides built-in support for querying objects via labels and applying bulk operations on the subset selected. Kubernetes labels are commonly used for sharing information with other colleagues. For example, you may use a label to record an owner identifier for the person responsible for a pod/deployment. Labels look like this:
"metadata": {
  "labels": {
    "key1" : "value1",
    "key2" : "value2",
    "key3" : "value3"
  }
}
2. Via Annotations
These are key-value pairs used to attach non-identifying metadata to objects. However, unlike labels, annotations are not generally meant for querying or applying operations to a subset of Kubernetes objects. Annotations look like this:
"metadata": {
   "annotations": {
     "key1" : "value1",
     "key2" : "value2",
     "key3" : "value3"
      }
 }
Use Cases for Kubernetes Labels
There are two main uses for labels in a Kubernetes environment:
1. Grouping Resources for Queries
By attaching consistent labels across different objects, you can quickly search Kubernetes for these objects using simple or advanced queries. For example, suppose you get a call from your developers asking if the dev environment is down. If the dev pods have a “dev” label, you can run the following kubectl command to get their status:
kubectl get pods -l 'environment in (dev)’
NAME  READY STATUS  RESTARTS  AGE
cert-manager-6588898cb4-25n79   0/1   ErrImagePull   0   3d2h
In this example, you might spot that one of the dev pods has an issue with pulling an image and provide that information to your developers who use the dev pod. If you didn’t have labels, you would have to manually grep the output of kubectl get pods based on some other non-structured convention.
2. Bulk Operations
In addition to queries, Kubernetes also allows for bulk operations using label selectors. For example, if you delete all your dev/staging environments at night to save on compute costs, you can automate the following command:
kubectl delete deployment,services,statefulsets -l environment in (dev,sit)
This command runs kubectl delete on all the returned objects that have the labels "environment": "dev" or "environment": "sit".
Labeling Best Practices
Follow these eight essential best practice recommendations to avoid common labeling mistakes:
- Learn the Syntax Properly
- Know the Label Selection Methods
- Use Recommended Labels
- Create Organization-Wide Label Naming Conventions
- Include Required Labels in Pod Templates
- Label Extensively
- Label Cross-Cutting Concerns
- Automate Labeling
1. Learn the Syntax Properly
Kubernetes labels use a key-value pair structure. Here’s what you need to know.
Keys
Keys can have two segments: a prefix and a name separated by a slash, for example, "<prefix>/<name>".
- Prefix: Optional; must be a valid DNS subdomain (e.g.,
"company.com/<name>"). - Name: supports up to 63 characters, including: alphanumeric, dashes, underscores, and dot characters.
The prefix is helpful for modules that are not private to the user, such as kube-scheduler, kubectl, etc. If you are installing external modules using helm, their labels’ keys likely have prefixes attached. The prefix also allows the use of multiple labels which might otherwise conflict with each other. For example, gatekeeper is a Customer Resource Definition (CRD) policy enforcer that can be installed as a chart using helm, and its labels are prefixed with gatekeeper.sh/.
The name (in the example company.com/<name>) contains the label’s arbitrary property name. For example, you may use company.com/environment to designate the environment type. The corresponding label values could be “production”, “testing,” and “development.” You can skip the company.com prefix if you don’t intend to distribute your resources outside of your company (as long as you don’t expect a naming conflict with another third-party package installed in your environment using the same label without a prefix).
Values
- Must have at most 63 characters
- Supports alphanumeric with dashes, underscores, and dots
- Must start and end with alphanumeric characters (unless empty)
2. Know the Label Selection Methods
Kubernetes provides two ways of selecting objects with labels: equality and set-based selectors.
- Equality: You can select objects which are equal or not equal to one or more label values. You can have multiple selectors separated by commas, and all conditions must be met for a resource to match this selector. As of part of this syntax, = and == signify equality, while != signifies inequality. For example, you can select
"environment=dev,release=nightly"to get the resources that have both labels attached. - Set: Allow selection according to multiple values. A set is similar to the
INkeyword in SQL. For example,"environment in (dev,uat)"will select both dev and uat labeled resources. The supported operators are “in”, “notin”, and “exists.”
3. Use Recommended Labels
Kubernetes provides a list of recommended labels that allow a baseline grouping of resource objects. The app.kubernetes.io prefix distinguishes between the labels recommended by Kubernetes and the custom labels that you may separately add using a company.com prefix. Some of the most popular recommended Kubernetes labels are listed below.
| Key | Description |
|---|---|
app.kubernetes.io/name |
Name of the application (e.g., redis) |
app.kubernetes.io/instance |
Unique name for this specific instance of the application (e.g., redis-department-a) |
app.kubernetes.io/component |
A descriptive identifier of what the component is for (e.g., login-cache) |
app.kubernetes.io/part-of |
The higher-level application using this resource (e.g., company-auth) |
4. Create Organization-Wide Label Naming Conventions
It is important to have label conventions that are followed strictly across the organization. All teams that use Kubernetes resources should follow the same clearly defined naming conventions. Your build pipeline should also verify config files to make sure that all required labels are attached.
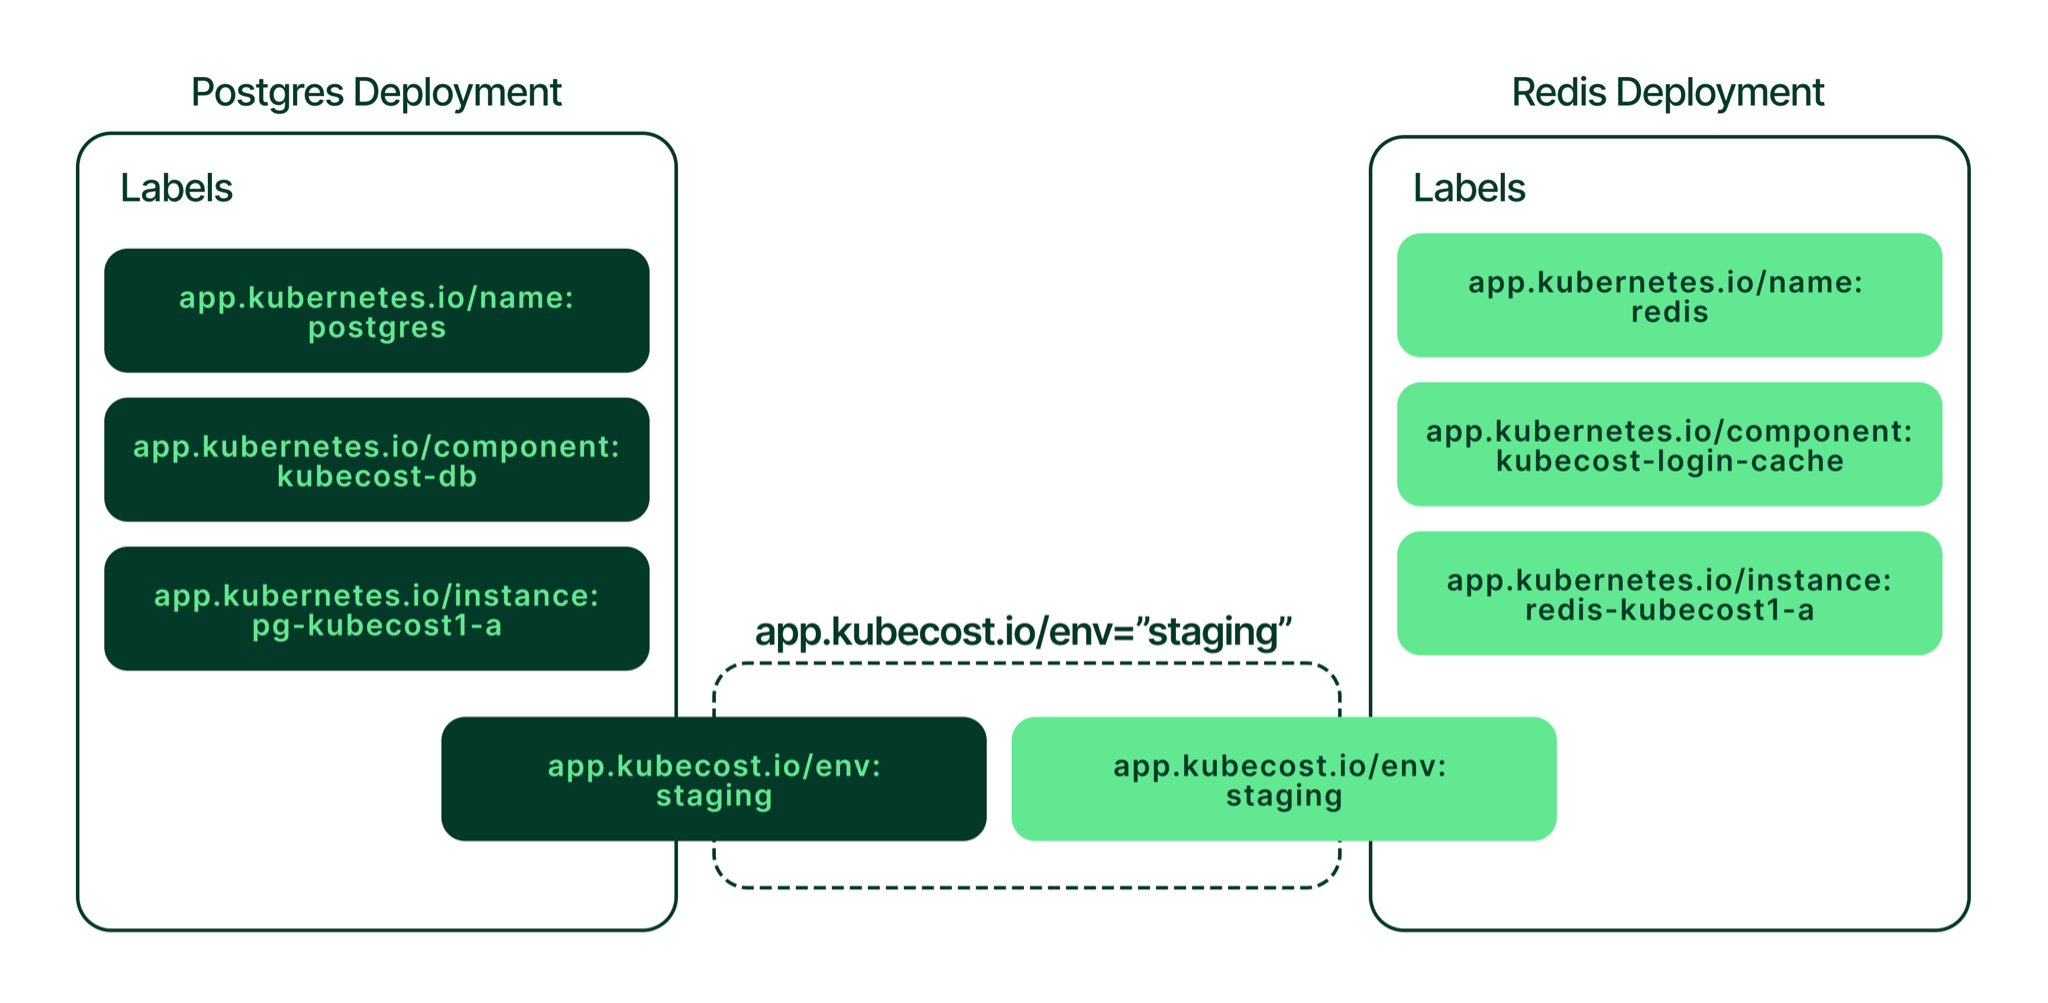
For example, say you are developing an app with a frontend, a backend, a Postgres database, and a Redis cache. The teams responsible for each of these layers should follow the same conventions for Kubernetes labels. If the convention for environments is to label with the key “app-environment,” then all layers should have the same key for the app environment. Many automated processes can break if the database team labels their resources with the key “environment.” Monitoring tools often rely on labels to filter the desired components supporting a production environment. This approach avoids raising monitoring alerts from Kubernetes components associated with the testing environment that would distract the operations teams.
5. Include Required Labels in Pod Templates
Select a subset of labels that you consider to be required and add them to your pod templates. Kubernetes controllers use pod templates as manifests to create a pod with specifications for its desired state. Pod templates are included in workload resources such as Deployments and DaemonSets. You can start with a small subset of labels. For example, you could start by requiring only three labels on your template: environment (product, testing), release (GA, beta), and owner.
6. Label Extensively
Label objects as much as possible to maintain visibility across your entire infrastructure. Suppose you need to quickly debug an issue or see which process is hogging your infrastructure resources. In such a scenario, extensive labeling will make it easier for you to drill down into your Kubernetes resources with precision.
7. Label Cross-Cutting Concerns
This best practice goes hand-in-hand with the previous one. You should make good use of labels to tag cross-cutting concerns since labels are meant to contain cross-cutting metadata.You can establish conventions at your organization to suit your needs. Here are some recommendations to get you started:
- Environment such as dev, staging, production
- A different tier of service, such as free-tier, pro-tier
- Release channels like nightly, stable, beta
- A specific tenant in a multi-tenant situation such as
department_a,department_b - Support contacts (e.g.,
"support": "database_team_ext_1120")
8. Automate Labeling
You can also automate some of the labels for cross-cutting concerns using your CI/CD (continuous integration and continuous delivery) tools. For example, if you have separate release CD pipelines for dev/staging/production, you can attach release stage labels and semantic version labels automatically using your CD tooling. This approach can also ensure that there is less reliance on the developers for labeling everything well.
Your CI jobs should also act as a last resort for required mandatory labels checks. If a team commits changes to their config files but is missing, say, the label for the support team contact, then the build should fail with a notification sent to the team for fixing the issue. This additional step in the process will ensure your production systems always contain the labels that the company requires organization-wide or department-wide.
Cheat Sheet
Here’s a quick table for you to refer back to on labeling best practices:
| Best practice | Summary |
| Know the syntax | Kubernetes enforces syntax on label keys and values. You need to review the documentation and use them according to the standards. |
| Know the different label selection methods | Equality and set-based selectors allow powerful ways of grouping and operating on different resource objects. |
| Use the Kubernetes recommended labels | Review and apply the common labels recommended in the Kubernetes documentation. |
| Create an organization-wide convention for labels | Labeling requires a consistent naming convention adopted by all groups and departments. Err on the side of simplicity over complexity. |
| Include required labels in pod templates | Include a subset of labels in the pod templates used by workload controllers to drive labeling consistency. |
| Label extensively | Tooling (such as monitoring) requires consistent labeling to be reliable. Remember that your tooling often filters by label and won’t see an unlabeled object. |
| Label cross-cutting concerns | To monitor resources according to structural differences, label them even if they cross-cut different concerns or share them. |
| Automate Labeling | Use CI/CD (continuous integration and continuous delivery) tooling to automate labeling. |
How NOT to Use Kubernetes Labels
While labels are great, there are some things you should NOT do with them. Here are three things you should avoid when working with Kubernetes labels:
- Don’t store frequently changing data or change labels without good reason on a running resource. Labels are mutable, but that does not mean that they should store identifying information that frequently changes. For example, you might not want to store the number of rows in a database as a label to keep track of the database size unless you are only updating it on a fixed-time basis.
- Don’t store application-level semantics on the system. Kubernetes labels are expected to identify and attach the resource objects with metadata but are not intended to be a data store for the underlying applications. The Kubernetes resources are transient and only loosely coupled with the application rendering the labels stale over time.
- Don’t get loose with naming conventions. As mentioned in the best practices section of labels, not having strict labeling conventions can be detrimental. For example, suppose you are time-pressed to query (or operate on) a few resource objects and suddenly realize that your cluster has multiple labels for the same tier. In that situation, you will likely fail your SLA requirements by the time you identify the correct label.
Final Thoughts
Labels are an essential built-in part of Kubernetes and can give you the equivalent of a scalpel to conduct powerful operations (such as getting complete visibility into your Kubernetes spend using Kubecost) on your cluster with precision. Use them consistently, and they will save you a lot of time!