Set optimal Kubernetes container requests in seconds using Kubecost
All too often, Kubernetes users vastly over-request resources because they aren’t familiar with the live performance profile of the container, and pick a conservative (i.e., too-high) request for CPU and memory. Over-requested resources are wasted resources, which result in wasted infrastructure spend. One of Kubecost’s most popular optimization features is the Request Sizing dashboard, which (1) identifies over-requested resources, (2) surfaces per-container requests: recommendations, and (3) estimates cost savings based on the recommendations. All of this is done with real-world usage data from the live containers in your cluster.
Until now, Kubecost users had to manually update their YAML requests: based on Kubecost’s recommendations or develop integrations with their preferred CD tool. Kubecost v1.93 introduces support for 1-Click Request Sizing, a feature that automatically applies Kubecost’s container request right-sizing recommendations with the click of a button. In this post, we’ll walk through an example of using the feature in a live cluster. We’ll make a fresh cluster, install Kubecost, add some over-requesting workloads, and then use Kubecost to right-size those requests.
Step 0: Create a cluster
If you already have a Kubernetes cluster, feel free to skip to Step 1.
We’ll be using GKE for this example, but Kubecost’s request sizing features work anywhere Kubecost runs, which is anywhere Kubernetes runs!
gcloud container clusters create \
    request-sizing-demo \
    --region "us-central1-c" \
    --num-nodes 3
Step 1: Install Kubecost (with Cluster Controller enabled)
If you already have Kubecost installed, you’ll have to make sure Cluster Controller is enabled via the Helm value described below.
Kubecost keeps all cluster modification capability in the Cluster Controller, a separate component, to provide a clear permission model. Because editing container requests requires K8s API write permission, the 1-click request sizing APIs live in Cluster Controller. Let’s install Kubecost with Cluster Controller enabled via Helm:
helm repo add kubecost https://kubecost.github.io/cost-analyzer/
helm repo update
helm upgrade \
    -i \
    --create-namespace kubecost \
    kubecost/cost-analyzer \
    --namespace kubecost \
    --set clusterController.enabled=true
Give the containers a minute or two to get running, and then have a look at what’s in the kubecost namespace:
→ kubectl get deployment -n kubecost
NAME                          READY   UP-TO-DATE   AVAILABLE   AGE
kubecost-cluster-controller   1/1     1            1           2m12s
kubecost-cost-analyzer        1/1     1            1           2m12s
kubecost-grafana              1/1     1            1           2m12s
kubecost-kube-state-metrics   1/1     1            1           2m12s
kubecost-prometheus-server    1/1     1            1           2m12s
Great, we’ve confirmed Kubecost is installed and running.
Step 2: Create an over-requesting workload
Now that Kubecost is installed, let’s create a workload that intentionally over-requests resources so we can take advantage of the 1-click request sizing feature. This bit of bash will create the namespace rsizing and a 2-replica Deployment of NGINX inside that namespace. Note the container requests!
kubectl apply -f - <<EOF
apiVersion: v1
kind: Namespace
metadata:
  name: rsizing
---
apiVersion: apps/v1
kind: Deployment
metadata:
  name: nginx-deployment
  namespace: rsizing
  labels:
    app: nginx
spec:
  replicas: 2
  selector:
    matchLabels:
      app: nginx
  template:
    metadata:
      labels:
        app: nginx
    spec:
      containers:
      - name: nginx
        image: nginx:1.14.2
        resources:
          requests:
            cpu: 300m
            memory: 500Mi
EOF
Let’s make sure everything is scheduled and running:
→ kubectl get pod -n rsizing
NAME                               READY   STATUS    RESTARTS   AGE
nginx-deployment-bd6c697bf-kdfvw   1/1     Running   0          10s
nginx-deployment-bd6c697bf-qvkrt   1/1     Running   0          11s
We can use some fancy JSONPath to check the running Pods and their containers’ requests:
→ kubectl get pod -n rsizing -o=jsonpath="{range .items[*]}{.metadata.name}{'\t'}{range .spec.containers[*]}{.name}{'\t'}{.resources.requests}{'\n'}{end}{'\n'}{end}"

nginx-deployment-bd6c697bf-kdfvw	nginx	{"cpu":"300m","memory":"500Mi"}

nginx-deployment-bd6c697bf-qvkrt	nginx	{"cpu":"300m","memory":"500Mi"}
So far, so good! Now let’s use Kubecost to fix the over-requesting.
Step 3: See and apply Kubecost’s recommendations
The easiest way to access Kubecost’s frontend is with kubectl’s port-forward:
kubectl port-forward -n kubecost service/kubecost-cost-analyzer 9090
Kubecost takes a few minutes to gather the usage profiling data it needs to make request sizing recommendations. Grab a coffee and a snack, then visit http://localhost:9090/request-sizing.html?filters=namespace%3Arsizing. That’s the request sizing recommendation page, already filtered to recommendations just for the rsizing namespace! Because we enabled Cluster Controller, you should also see a nice blue button which says: “Automatically implement recommendations.” Here’s what it should look like once Kubecost has the data it needs:
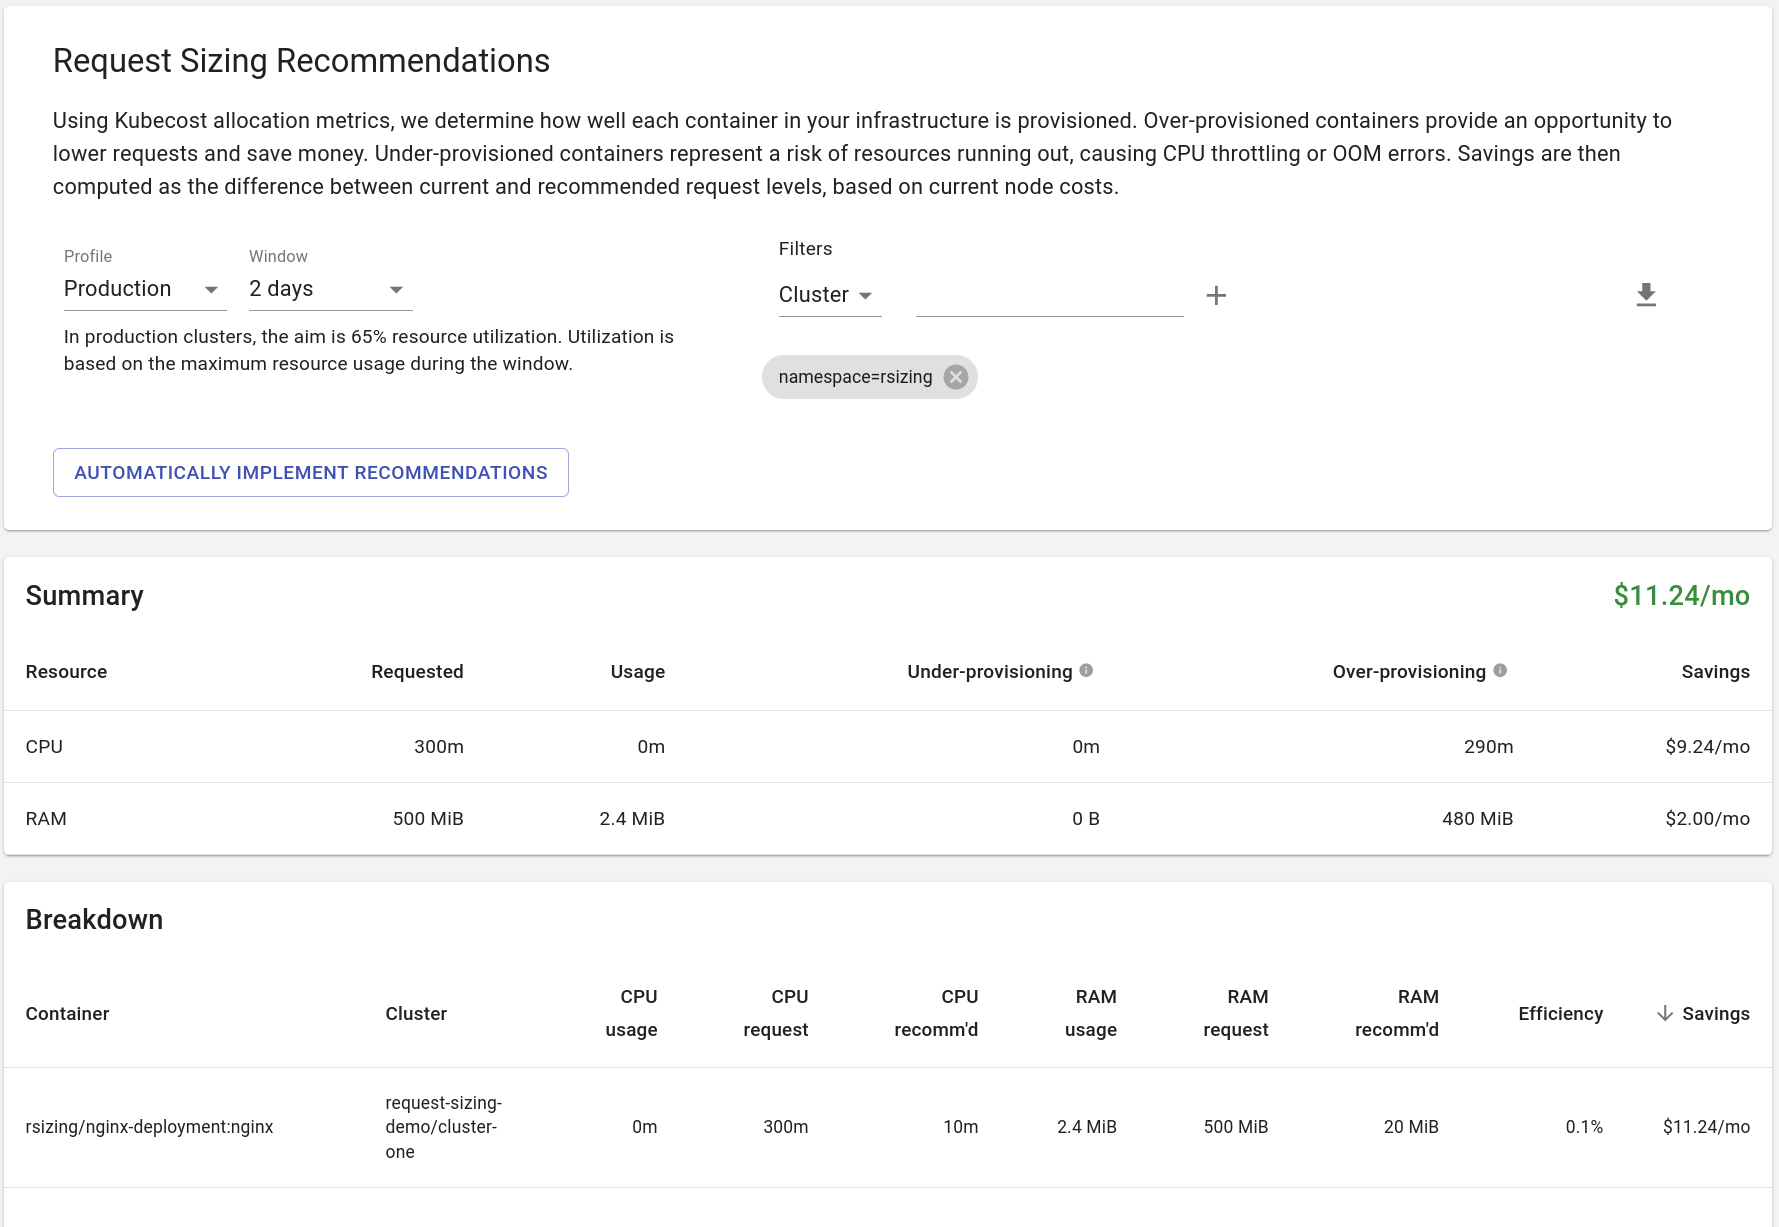
As we know, our NGINX Deployment is vastly overprovisioned because it isn’t handling any traffic. Kubecost has correctly identified this and suggested a baseline CPU request of 10m and RAM request of 20MiB. Now, let’s click the “Automatically implement recommendations” button. You’ll see the following modal appear:

Because we’ve already filtered the recommendations down to the rsizing namespace, the implementation will only apply the filtered set of recommendations. Once we hit “Yes,” we can check on the cluster status:
→ kubectl get pod -n rsizing                             NAME                                READY   STATUS        RESTARTS   AGE
nginx-deployment-574cd8ff7f-5czgz   1/1     Running       0          16s
nginx-deployment-574cd8ff7f-srt8j   1/1     Running       0          9s
nginx-deployment-bd6c697bf-kdfvw    0/1     Terminating   0          53m
nginx-deployment-bd6c697bf-qvkrt    0/1     Terminating   0          53m
Once the old versions of the Pod are done terminating, we’ll have a look at that special JSONPath view of request for our new Pods:
→ kubectl get pod -n rsizing -o=jsonpath="{range .items[*]}{.metadata.name}{'\t'}{range .spec.containers[*]}{.name}{'\t'}{.resources.requests}{'\n'}{end}{'\n'}{end}"

nginx-deployment-574cd8ff7f-5czgz	nginx	{"cpu":"10m","memory":"20971520"}

nginx-deployment-574cd8ff7f-srt8j	nginx	{"cpu":"10m","memory":"20971520"}
Awesome! Kubecost has resized our container requests for us. And it hasn’t just done it at the Pod level, requests have been resized (as you would expect) at the Deployment level:
→ kubectl get deploy -n rsizing nginx-deployment -o=jsonpath='{.spec.template.spec.containers[0].resources}' | jq
{
  "requests": {
    "cpu": "10m",
    "memory": "20971520"
  }
}
Step 4: Clean up the demo cluster
Finally, we’ll clean up the demo cluster so we don’t waste any money from keeping the test running.
gcloud container clusters delete \
    request-sizing-demo \
    --region "us-central1-c"
Learn more!
This post was a walk-through of a simple example of automated request right-sizing using Kubecost. If you have more advanced questions or complex applications, you can check out our official documentation:
If you like 1-click request sizing or have ideas on how we can improve this feature, join our community and let us know: we’re available via Slack, GitHub issue, and email.